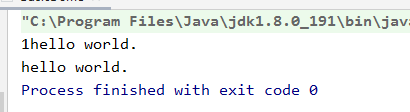
1 打印信息
打印信息,在System.out下面,主要有:
- print:标准输出,但是不会换行
- printf:可以使用类似C语言中的语法,进行格式化输出,即:
printf("%s", prama),printf也不会换行
- println:输出完之后,会自动换行

代码:
1
2
3
4
5
6
7
8
| public class BasicDemo {
public static void main(String[] args) {
System.out.printf("%s", new Integer(1));
System.out.println("hello world.");
System.out.print("hello world.");
}
}
|
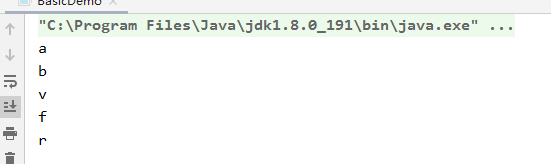
运行结果:
2 循环控制结构
2.1 for循环
- 方式1:
for(int i=0;i<length;i++)
1
2
3
4
5
6
7
8
9
10
11
12
13
| public class BasicDemo {
public static void main(String[] args) {
List<String> list = new ArrayList<>();
list.add("a");
list.add("b");
list.add("v");
list.add("f");
list.add("r");
for (int i = 0; i < list.size(); i++) {
System.out.println(list.get(i));
}
}
}
|
- 方式2:
for(Object object : iterators)
1
2
3
4
5
6
7
8
9
10
11
12
13
| public class BasicDemo {
public static void main(String[] args) {
List<String> list = new ArrayList<>();
list.add("a");
list.add("b");
list.add("v");
list.add("f");
list.add("r");
for(String string : list){
System.out.println(string);
}
}
}
|
- 方式3:
list.forEach(temp->{ ... })
1
2
3
4
5
6
7
8
9
10
11
12
13
| public class BasicDemo {
public static void main(String[] args) {
List<String> list = new ArrayList<>();
list.add("a");
list.add("b");
list.add("v");
list.add("f");
list.add("r");
list.forEach(temp->{
System.out.println(temp);
});
}
}
|
运行结果:
2.2 while循环
1
2
3
4
5
6
7
8
9
10
11
12
13
14
15
| public class BasicDemo {
public static void main(String[] args) {
List<String> list = new ArrayList<>();
list.add("a");
list.add("b");
list.add("v");
list.add("f");
list.add("r");
int index = 0;
while(index < list.size()){
System.out.println(list.get(index));
index += 1;
}
}
}
|
2.3 do…while循环
1
2
3
4
5
6
7
8
9
10
11
12
13
14
15
| public class BasicDemo {
public static void main(String[] args) {
List<String> list = new ArrayList<>();
list.add("a");
list.add("b");
list.add("v");
list.add("f");
list.add("r");
int index = 0;
do{
System.out.println(list.get(index));
index += 1;
}while(index < list.size());
}
}
|
while和do…while的区别:
- do…while循环至少循环一次
- while循环可以一次都不循环
3 if…else
1
2
3
4
5
6
7
8
9
10
11
12
| public class BasicDemo {
public static void main(String[] args) {
int a = 1;
if(a == 1){
System.out.println("a is " + a);
}else if (a == 2){
System.out.println("a is " + a);
} else{
System.out.println("a is not 1");
}
}
}
|
4 获取用户输入
在java中获取用户输入,通常情况下,使用java.util.Scanner类。Scanner具有以下的一些方法:
- hasNext():判断是否有字符换输入
- hasNextxxx():判断是否有与
xxx对应的数据类型输入
4.1 如下面的代码(这里以输入int型整数为例):
1
2
3
4
5
6
7
8
9
10
11
12
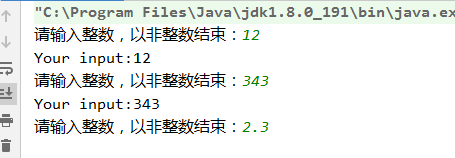
| public class BasicDemo {
public static void main(String[] args) {
Scanner scanner = new Scanner(System.in);
System.out.print("请输入整数,以非整数结束:");
while (scanner.hasNextInt()){
int s = scanner.nextInt();
System.out.println("Your input:" + s);
System.out.print("请输入整数,以非整数结束:");
}
scanner.close();
}
}
|
结束条件:当输入的数据与hasNextxxx()中的xxx不相符时,退出。
运行结果:
4.2 hasNext()输入任何字符
next()
- 一定要读取到有效字符后才可以结束输入。
- 一定要读取到有效字符后才可以结束输入。
- 只有输入有效字符后才将其后面输入的空白作为分隔符或者结束符。
- next() 不能得到带有空格的字符串。
1
2
3
4
5
6
7
8
9
10
11
12
13
14
15
16
| public class BasicDemo {
public static void main(String[] args) {
Scanner scanner = new Scanner(System.in);
System.out.print("请输入字符串,输入exit结束:");
while (scanner.hasNext()){
String s = scanner.next();
if ("exit".equals(s)){
System.out.println("over");
break;
}
System.out.println("Your input:" + s);
System.out.print("请输入字符串,输入exit结束:");
}
scanner.close();
}
}
|
运行结果:
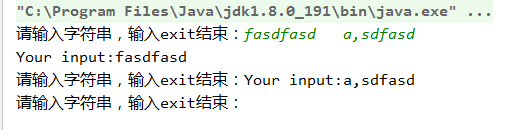
nextLine()
- 以Enter为结束符,也就是说 nextLine()方法返回的是输入回车之前的所有字符。
- 可以获得空白。
1
2
3
4
5
6
7
8
9
10
11
12
13
14
15
16
| public class BasicDemo {
public static void main(String[] args) {
Scanner scanner = new Scanner(System.in);
System.out.print("请输入字符串,输入exit结束:");
while (scanner.hasNext()){
String s = scanner.nextLine();
if ("exit".equals(s)){
System.out.println("over");
break;
}
System.out.println("Your input:" + s);
System.out.print("请输入字符串,输入exit结束:");
}
scanner.close();
}
}
|
结束条件:自己制定,在while循环中做判断。
5 switch…case
这是一个选择结构,类似if。
1
2
3
4
5
6
7
8
9
10
11
12
13
14
15
16
17
18
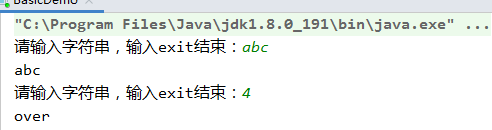
| public class BasicDemo {
public static void main(String[] args) {
Scanner scanner = new Scanner(System.in);
System.out.print("请输入字符串,输入exit结束:");
while (scanner.hasNext()){
String s = scanner.nextLine();
switch (s){
case "exit": break;
case "abc":
System.out.println(s);
System.out.print("请输入字符串,输入exit结束:");
break;
default: System.out.println("over");break;
}
}
scanner.close();
}
}
|
运行结果:
6 数组
6.1 定义数组
- 字符串数组:
String[] strings = new String[5]; //[]中指定数组的大小,默认值是null
- 字节数组:
byte[] bytes = new byte[5];,默认值是0
- 字符数组:
char[] chars = new char[5];,默认值是\u0000
- 整数数组:
int[] ints = new int[5];,默认值是0
- 浮点数数组:
double[] doubles = new double[5];,默认值是0.0dfloat[] floats = new float[5];,默认值是0.0f
6.2 给数组赋值
数组的赋值都是给指定下标进行赋值,这里以strings为例:
1
2
3
4
5
6
7
8
9
10
| public class BasicDemo {
public static void main(String[] args) {
String[] strings = new String[5];
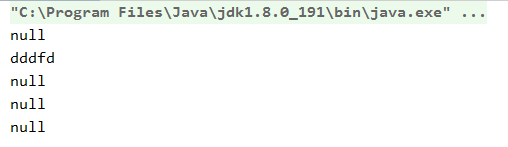
strings[1] = "dddfd";
for(int i=0;i<strings.length;i++){
System.out.println(strings[i]);
}
}
}
|
输出结果:
7 线程
7.1 通过实现Runable接口,来创建线程
RunableDemo.java代码:
1
2
3
4
5
6
7
8
9
10
11
12
13
14
15
16
17
18
19
20
21
22
23
24
| public class RunableDemo implements Runnable {
private String name;
private Thread thread;
public RunableDemo(String name) {
this.name = name;
}
@Override
public void run() {
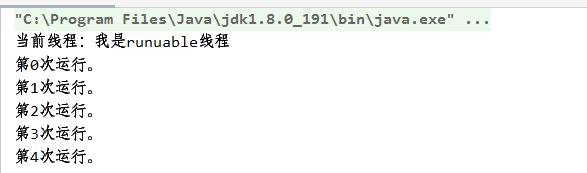
System.out.println("当前线程:" + this.name);
for (int i = 0; i < 5; i++) {
System.out.println("第" + i + "次运行。");
}
}
public void start(){
if (thread == null){
thread = new Thread(this, name);
thread.start();
}
}
}
|
main.java代码:
1
2
3
4
5
6
| public class ThreadDemo {
public static void main(String[] args) throws InterruptedException {
RunableDemo runableDemo = new RunableDemo("我是runuable线程");
runableDemo.start();
}
}
|
运行结果:
7.2通过集成Thread类,来创建线程
ThreadDemo.java
1
2
3
4
5
6
7
8
9
10
11
12
13
14
15
16
17
18
19
20
21
22
23
24
25
26
| public class ThreadDemo extends Thread{
private String name;
private Thread thread;
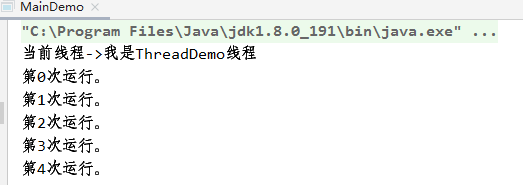
public void run(){
System.out.println("当前线程->" + this.name);
for (int i = 0; i < 5; i++) {
System.out.println("第" + i + "次运行。");
}
}
public void start(){
if(this.thread == null){
this.thread = new Thread(this,this.name);
this.thread.start();
}
}
public ThreadDemo() {
}
public ThreadDemo(String name) {
this.name = name;
}
}
|
main.java代码:
1
2
3
4
5
6
| public class MainDemo {
public static void main(String[] args) {
ThreadDemo threadDemo = new ThreadDemo("我是ThreadDemo线程");
threadDemo.start();
}
}
|
运行结果:
7.3 使用Thread匿名调用
直接看代码:
1
2
3
4
5
6
7
8
9
| public class MainDemo {
public static void main(String[] args) {
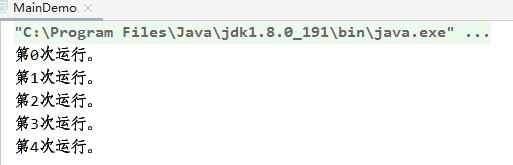
new Thread(() -> {
for (int i = 0; i < 5; i++) {
System.out.println("第" + i + "次运行。");
}
}).start();
}
}
|
运行结果:
7.4 通过Callable来创建线程
1
2
3
4
5
6
7
8
9
10
11
12
13
14
15
16
17
18
19
20
21
22
23
24
| import java.util.concurrent.*;
public class CallableDemo implements Callable<Integer> {
@Override
public Integer call() throws Exception {
System.out.println("这是callable线程-->" + Thread.currentThread().getName());
return 0;
}
public static void main(String[] args) {
CallableDemo callableDemo = new CallableDemo();
ExecutorService service = Executors.newFixedThreadPool(3);
Future<Integer> res1 = service.submit(callableDemo);
Future<Integer> res2 = service.submit(callableDemo);
Future<Integer> res3 = service.submit(callableDemo);
System.out.println(res1);
System.out.println(res2);
System.out.println(res3);
service.shutdown();
}
}
|
运行结果:
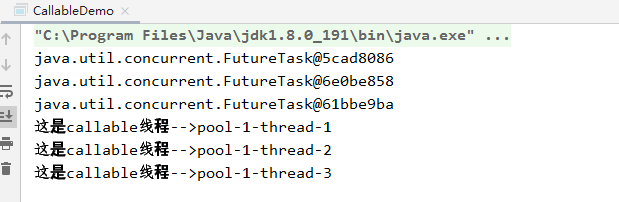
1
2
3
4
5
6
7
8
9
10
11
12
13
14
15
16
17
| import java.util.concurrent.*;
public class CallableDemo implements Callable<Integer> {
@Override
public Integer call() throws Exception {
System.out.println("这是callable线程-->" + Thread.currentThread().getName());
return 0;
}
public static void main(String[] args) {
CallableDemo callableDemo = new CallableDemo();
FutureTask futureTask = new FutureTask(callableDemo);
new Thread(futureTask).start();
}
}
|
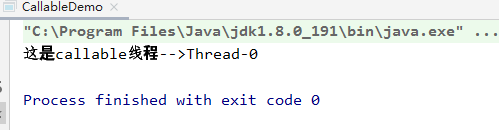
运行结果:
7.5 线程同步
当我们在使用多线程访问同一个资源并需要对其进行增删改时,如果某一时刻,有多个线程同时对该资源进行了修改,那么就会导致该资源的数据紊乱。那么解决办法就是,当某一个线程该资源时,就将该资源锁住,其他线程只有等待该线程执行完毕之后,才能对该线程进行修改。
先看一种线程不安全的同步代码:
1
2
3
4
5
6
7
8
9
10
11
12
13
14
15
16
17
18
19
20
21
22
23
24
25
26
27
28
29
30
31
32
33
| public class Ticket implements Runnable{
private int ticketNum = 10;
private boolean flag = true;
@Override
public void run() {
while (flag){
buy();
try {
Thread.sleep(1000);
} catch (InterruptedException e) {
e.printStackTrace();
}
}
}
public void buy(){
if (ticketNum > 0){
System.out.println(Thread.currentThread().getName() + "-->" + ticketNum--);
}else{
flag = false;
return;
}
}
public static void main(String[] args) {
Ticket ticket = new Ticket();
new Thread(ticket,"aaa").start();
new Thread(ticket,"bbb").start();
new Thread(ticket,"ccc").start();
}
}
|
运行结果:
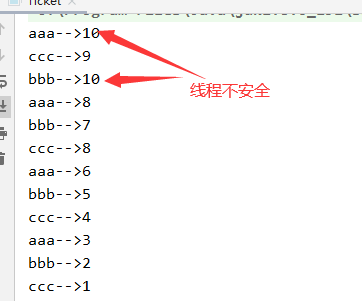
从图中我们可以到,有两个线程同时获得了第10张票,现实中是不存在这种情况的。
- synchronized
被synchronized修饰符修饰的变量或者方法,在同一时刻,只能被一个线程访问。使用synchronized修饰符将需要同步的资源“锁”起来,这样就可以避免多个线程同时竞争了。
- 写法1:给修改同步资源的方法加上
synchronized修饰符。
1
2
3
4
5
6
7
8
9
10
11
12
13
14
15
16
17
18
19
20
21
22
23
24
25
26
27
28
29
30
31
32
33
| public class Ticket implements Runnable{
private int ticketNum = 10;
private boolean flag = true;
@Override
public void run() {
while (flag){
buy();
try {
Thread.sleep(1000);
} catch (InterruptedException e) {
e.printStackTrace();
}
}
}
public synchronized void buy(){
if (ticketNum > 0){
System.out.println(Thread.currentThread().getName() + "-->" + ticketNum--);
}else{
flag = false;
return;
}
}
public static void main(String[] args) {
Ticket ticket = new Ticket();
new Thread(ticket,"aaa").start();
new Thread(ticket,"bbb").start();
new Thread(ticket,"ccc").start();
}
}
|
- 写法2:将需要锁住的资源用
()括起来,()中必须是一个对象,基本数据类型需要使用装饰类
1
2
3
4
5
6
7
8
9
10
11
12
13
14
15
16
17
18
19
20
21
22
23
24
25
26
27
28
29
30
31
32
33
34
35
36
| public class Ticket implements Runnable{
private static Integer ticketNum = 10;
private boolean flag = true;
@Override
public void run() {
synchronized (ticketNum){
while (flag){
buy();
try {
Thread.sleep(1000);
} catch (InterruptedException e) {
e.printStackTrace();
}
}
}
}
public void buy(){
if (ticketNum > 0){
System.out.println(Thread.currentThread().getName() + "-->" + ticketNum--);
}else{
flag = false;
return;
}
}
public static void main(String[] args) {
synchronized (ticketNum){
Ticket ticket = new Ticket();
new Thread(ticket,"aaa").start();
new Thread(ticket,"bbb").start();
new Thread(ticket,"ccc").start();
}
}
}
|
- Lock锁
使用该锁,可以对需要同步的对象进行手动加锁,然后关锁。synchronized不能显式的指定加锁的位置,使用Lock可以手动给对象加锁。
1
2
3
4
5
6
7
8
9
10
11
12
13
14
15
16
17
18
19
20
21
22
23
24
25
26
27
28
29
30
31
32
33
34
35
36
37
38
39
40
41
42
43
| import java.util.concurrent.locks.ReentrantLock;
public class Ticket implements Runnable {
private static Integer ticketNum = 10;
private boolean flag = true;
private static final ReentrantLock lock = new ReentrantLock();
@Override
public void run() {
while (flag) {
buy();
try {
Thread.sleep(1000);
} catch (InterruptedException e) {
e.printStackTrace();
}
}
}
public void buy() {
try {
lock.lock();
if (ticketNum > 0) {
System.out.println(Thread.currentThread().getName() + "-->" + ticketNum--);
} else {
flag = false;
return;
}
} finally {
lock.unlock();
}
}
public static void main(String[] args) {
synchronized (ticketNum) {
Ticket ticket = new Ticket();
new Thread(ticket, "aaa").start();
new Thread(ticket, "bbb").start();
new Thread(ticket, "ccc").start();
}
}
}
|
7.6 线程间协程
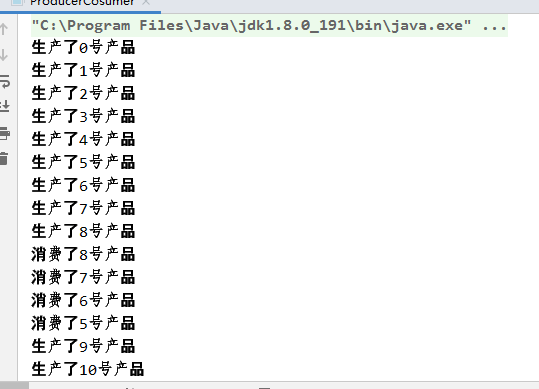
消费者和生产者问题:当消费者需要消费某一个产品时,必须先由生产者生产出来,才能消费,否则就只能等待生产者生产。
1
2
3
4
5
6
7
8
9
10
11
12
13
14
15
16
17
18
19
20
21
22
23
24
25
26
27
28
29
30
31
32
33
34
35
36
37
38
39
40
41
42
43
44
45
46
47
48
49
50
51
52
53
54
55
56
57
58
59
60
61
62
63
64
65
66
67
68
69
70
71
72
73
74
75
76
77
78
79
80
81
82
83
84
85
86
87
| public class ProducerCosumer {
public static void main(String[] args) {
Cache cache = new Cache();
Producer producer = new Producer(cache);
Cosumer cosumer = new Cosumer(cache);
new Thread(producer).start();
new Thread(cosumer).start();
}
}
class Producer implements Runnable{
Cache cache;
public Producer(Cache cache) {
this.cache = cache;
}
@Override
public void run() {
for (int i = 0; i < 100; i++) {
cache.producing(new Prodcut(i));
System.out.println("生产了" + i + "号产品");
}
}
}
class Cosumer implements Runnable{
Cache cache;
public Cosumer(Cache cache) {
this.cache = cache;
}
@Override
public void run() {
for (int i = 0; i < 100; i++) {
Prodcut prodcut = cache.cosuming();
System.out.println("消费了" + prodcut.id + "号产品");
}
}
}
class Prodcut{
int id;
public Prodcut(int id) {
this.id = id;
}
}
class Cache{
Prodcut[] prodcuts = new Prodcut[10];
int count = 0;
public synchronized void producing(Prodcut prodcut) {
if (count == prodcuts.length - 1){
try {
this.wait();
} catch (InterruptedException e) {
e.printStackTrace();
}
}
prodcuts[count] = prodcut;
count++;
this.notifyAll();
}
public synchronized Prodcut cosuming(){
if (count == 0){
try {
this.wait();
} catch (InterruptedException e) {
e.printStackTrace();
}
}
count--;
Prodcut prodcut = prodcuts[count];
this.notifyAll();
return prodcut;
}
}
|
运行结果:
写在最后
欢迎大家关注鄙人的公众号【麦田里的守望者zhg】,让我们一起成长,谢谢。

 wechat
 alipay
 bitcoin