0 安装
进入git官网,下载对应版本的git安装包。Windows | Linux/Unix | Mac
Linux平台快速安装:
1 | //ubuntu/Debian 安装 |
Linux平台源码安装:
1 | ########## Centos/RedHat ########## |
Windows、Mac直接界面安装即可,这里省略…
1 准备工作
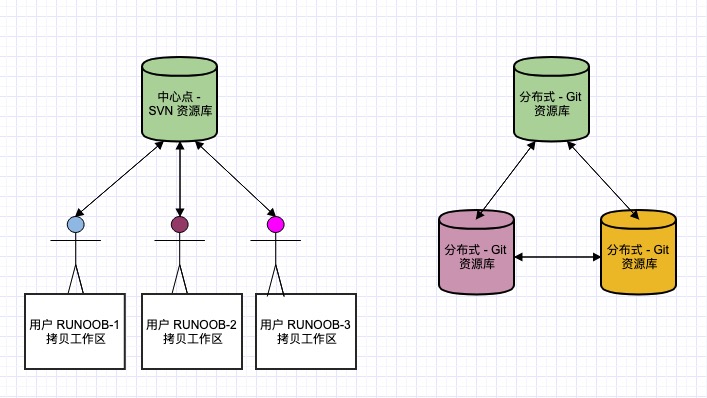
1.1 git与svn的区别:
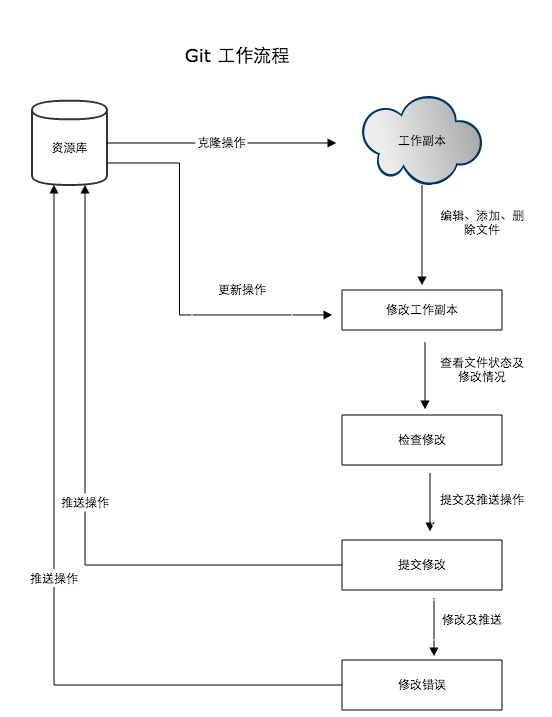
1.2 git一般工作流程
- 从远程
git仓库克隆git资源作为工作目录。(git clone) - 在克隆的资源上添加或修改文件。(
git add/commit/push) - 如果其他人修改了,你可以更新资源。(
git pull/fetch) - 在提交前查看修改。
- 提交修改。(
git commit) - 在修改完成后,如果发现错误,可以撤回提交并再次修改并提交。(
git reset --soft/mixed/hard)
1.3 git中的工作区、暂存区和版本库
- 工作区:就是你在电脑里能看到的目录。
- 暂存区:英文叫
stage或index。一般存放在.git目录下的index文件(.git/index)中,所以我们把暂存区有时也叫作索引(index)。 - 版本库:工作区有一个隐藏目录
.git,这个不算工作区,而是Git的版本库。
三者的关系:
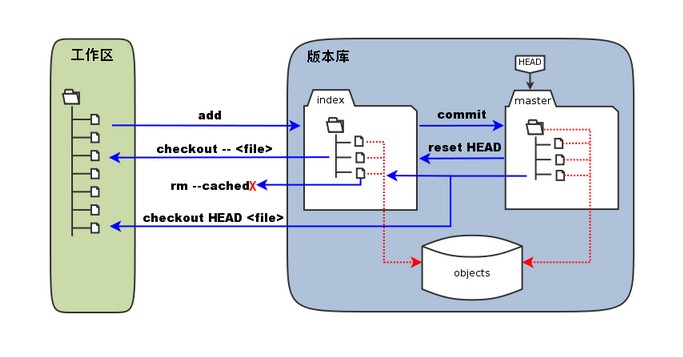
- 图中左侧为工作区,右侧为版本库。在版本库中标记为 “
index“ 的区域是暂存区(stage/index),标记为 “master“ 的是master分支所代表的目录树。 - 图中我们可以看出此时 “
HEAD“ 实际是指向master分支的一个”游标”。所以图示的命令中出现HEAD的地方可以用master来替换。 - 图中的
objects标识的区域为Git的对象库,实际位于 “.git/objects“ 目录下,里面包含了创建的各种对象及内容。 - 当对工作区修改(或新增)的文件执行
git add命令时,暂存区的目录树被更新,同时工作区修改(或新增)的文件内容被写入到对象库中的一个新的对象中,而该对象的ID被记录在暂存区的文件索引中。 - 当执行提交操作(
git commit)时,暂存区的目录树写到版本库(对象库)中,master分支会做相应的更新。即master指向的目录树就是提交时暂存区的目录树。 - 当执行
git reset HEAD命令时,暂存区的目录树会被重写,被master分支指向的目录树所替换,但是工作区不受影响。 - 当执行
git rm --cached <file>命令时,会直接从暂存区删除文件,工作区则不做出改变。 - 当执行
git checkout .或者git checkout -- <file>命令时,会用暂存区全部或指定的文件替换工作区的文件。这个操作很危险,会清除工作区中未添加到暂存区中的改动。 - 当执行
git checkout HEAD .或者git checkout HEAD <file> 命令时,会用HEAD指向的master分支中的全部或者部分文件替换暂存区和以及工作区中的文件。这个命令也是极具危险性的,因为不但会清除工作区中未提交的改动,也会清除暂存区中未提交的改动。
2 常用命令
2.1 add
将文件添加本地暂存区
用法:
1 | $ git add <file>... |
2.2 rm
用法1:
当你使用git add添加了某个文件之后,然后又不想提交到本地暂存库了,那么可以使用下面的命令:
1 | $ git rm --cached <file>... |
2.3 commit
用法:
1 | $ git commit <file>... [-m] |
-m:提交时的备注信息--amend:修改已经提交的备注信息1
2
3
4git add .
git commit -m "xx"
# 此时发现这个"xx"备注信息不太合理,我只想要修改这个备注信息
git commit --amend -m "*"
2.4 remote
设置远程仓库地址
用法:
1 | $ git remote add [origin_alias] |
1 | $ git remote -v //查看远程仓库地址 |
2.5 push
用法:
1 | $ git push [origin_alias] [branch_name] |
如果配置remote远程仓库地址,那么在推送的时候,可以直接使用git push 命令进行推送,如果没有的话,需要使用git remote添加远程仓库地址才能push。使用git push默认推送当前分支的数据到远程仓库,如果想要指定分支和仓库地址,则可以使用git push origin master命令。
2.6 pull&fetch
git pull与git fetch的区别
git fetch --all拉取远程分支内容到本地的远程分支,但不与本地关联的分支合并git pull拉取远程分支内容到本地的远程分支,并与本地关联分支进行自动合并
2.7 checkout
假如你想从master起一个新的分支,也就是把master分支的代码复制一份,并创建一个新的分支,这个新分支的代码就是master当前的代码,你可以使用以下命令:
1 | $ git checkout master //切换到master分支上 |
git-checkout - Switch branches or restore working tree files
2
3
4
5
$ git checkout new_branch
Switched to branch 'new_branch'
ASUS@ZHG_ASUS MINGW64 ~/OneDrive/learngit (new_branch)
2.8 branch
branche是git tree中的分支,其中主分支是master
1 | $ git branch <branch name> # create a new branch |
git修改本地和远程分支名
重命名本地分支
git branch命令用来管理分支,参数-m或者--move,用来移动或者重命名分支以及相应的提交log。例如:1
$ git branch -m oldbranch newbranch
会将本地的oldbranch分支重命名为newbranch。
删除对应的远程分支
git push origin :oldbranch,此命令会在origin仓库中匹配oldbranch分支,然后删除它。注意:oldbranch前面有一个冒号(
:)将本地重命名的分支提交到仓库
git push origin newbranch,这样本地的分支和远程的分支就对应起来了。
2.9 merge
2
3
4
5
6
7
8
9
10
Jums@Computer MINGW64 ~/OneDrive/learngit (master) # current branch is master, merge <topic> to master
$ git merge topic
Auto-merging readme.md
CONFLICT (content): Merge conflict in readme.md
Auto-merging 2.py
CONFLICT (content): Merge conflict in 2.py
Removing 1.py
Automatic merge failed; fix conflicts and then commit the result.How to fix merge conflict:
When the merge conflict comes: When two files have two different sets of modifications in the same location, git cannot decide which modification to use and needs to be manually specified.
The codes bewteen
<<<<<<<HEADand=======is in the current branch, and the codes bewtten=======and>>>>>>[branch name]is in the [branch name]. You shoud manually merged the codes.After that, you also should
addthe files to repository, use the following command:
2
$ git commit -m "" # you can't add the [file name] here, or you will get a error
2.10 rebase
git-rebase - Reapply commits on top of another base tip
https://www.bilibili.com/video/BV19B4y1u7vm?from=search&seid=7525997366811669539 (video tutroials)
2.11 reset
用法:
1 | $ git reset [--soft | --hard | --mixed] [version_code] |
对提交的版本进行回退,可以根据
git log命令查看已经提交的版本,然后可以根据指定commit id或者HEAD回退到不同的版本,
git log信息如下:
2
3
4
5
6
7
8
9
10
11
12
13
14
15
16
17
18
commit 466755c74ed4fd27059f6b0e4f42d0c3dcb8b663 (HEAD -> master, origin/master)
Author: crazyjums <crazyjums@gmail.com>
Date: Mon Jun 21 14:58:11 2021 +0800
add a second title
commit b57119f13a741f116daabfebd27b51a990b7322a
Author: crazyjums <crazyjums@gmail.com>
Date: Mon Jun 21 14:39:35 2021 +0800
modified the file, add a new line
commit 1f7990b84caf752f9e22d1dbcf215d5285066d25
Author: crazyjums <crazyjums@gmail.com>
Date: Mon Jun 21 14:27:27 2021 +0800
first time to commit
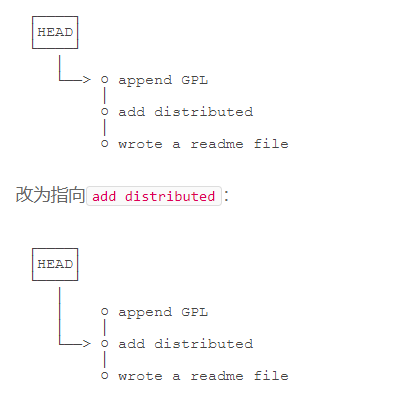
HEAD表示当前的版本号,如果需要回退到上一个版本号,则可以使用HEAD^、上上一个版本号则是HEAD^^、往上倒100个可以在HEAD后面写上100个^符号,当然也可以写成HEAD~100。
HEAD在git中其实是一个指针,指向不同的版本号,回退也就是将HEAD指针重新指向了不同的版本信息。
除了使用
HEAD之外,还可以使用commit id进行回退,每一次版本提交都有一个宇宙唯一的commit id,指定该commit id的前几位就行,git会自行查找。
2
3
4
5
HEAD is now at 1f7990b first time to commit
$ git reset --hard 466755
HEAD is now at 466755c add a second title在使用
git log命令时,只会显示当前命令窗口的历史提交记录,如果电脑重启之后,在使用git log命令出现的历史记录会是空,但是在git中,就算是重启电脑之后,还是有办法找到每一次的历史提交记录,可以使用命令:git reflog:
2
3
4
5
6
7
8
9
1f7990b (HEAD -> master) HEAD@{0}: reset: moving to HEAD~2
466755c (origin/master) HEAD@{1}: reset: moving to 466755
1f7990b (HEAD -> master) HEAD@{2}: reset: moving to HEAD~2
466755c (origin/master) HEAD@{3}: reset: moving to 466755
b57119f HEAD@{4}: reset: moving to HEAD^
466755c (origin/master) HEAD@{5}: commit: add a second title
b57119f HEAD@{6}: commit: modified the file, add a new line
1f7990b (HEAD -> master) HEAD@{7}: commit (initial): first time to commit在使用
reset等命令修改了本地文件之后,也就是当前本地电脑上的文件不是git托管平台的最新版本的时候,需要使用git pull命令将git平台的命令拉过来。
2
3
4
5
6
From github.com:crazyjums/learngit
* branch master -> FETCH_HEAD
Auto-merging readme.md
CONFLICT (content): Merge conflict in readme.md
Automatic merge failed; fix conflicts and then commit the result.
使用场景1-git撤销commit:
当我们写完代码后,我们一般都是
1 | git add . // 添加所有文件 |
当我们git commit完之后,还没有执行git push,想修改/撤销这个commit,怎么办?
1、如果只是想修改注释,可以这样操作
git commit --amend
这个时候进入vim编辑,直接修改即可,修改完注释,退出vim编辑:wq保存已编辑的注释,重新git push即可
2、要撤回commit
git reset --soft HEAD^
这样就能成功的撤回你刚刚的commit操作。
HEAD^的意思是上一个版本,也可以写成HEAD12
如果你进行了2次commit,想都撤回,可以使用HEAD
注意,这个命令仅仅是撤回commit操作,写的代码仍然保留
git reset三个参数的作用对比:
--mixed
意思是:不删除工作空间改动代码,撤销commit,并且撤销git add . 操作
这个为默认参数,git reset --mixed HEAD^和git reset HEAD^效果是一样的。
--soft
不删除工作空间改动代码,撤销commit,不撤销git add .
--hard
删除工作空间改动代码,撤销commit,撤销git add .
注意完成这个操作后,会删除工作空间代码!!!恢复到上一次的commit状态。慎重!!!
2.12 revert
git-revert - Revert some existing commits
sounds like the
git resetcommand, but this command can remain the trackability information, when you wana go back to the history version inmasterbranch, you should usegit revertcommand instead ofgit reset.This command’s usage just like the
git reset.
2
3
4
5
6
7
8
9
10
$ git revert HEAD~[number] # go back to previous version
# you can see the trackability information at `git revert`:
commit d567e6e3e14165ffa8febd4c62bac2fa413a1509
Author: crazyjums <crazyjums@gmail.com>
Date: Thu Jun 24 11:33:43 2021 +0800
Revert "add a txt file by jums"
This reverts commit db298e7bb373711438efdab0e64bbab72b5b5cac.
2.13 stash
git-stash - Stash the changes in a dirty working directory away
git stash会把所有未提交的修改(包括暂存的和非暂存的)都保存起来,用于后续恢复当前工作目录。
应用场景:https://www.cnblogs.com/tocy/p/git-stash-reference.html
- 发现有一个类是多余的,想删掉它又担心以后需要查看它的代码,想保存它但又不想增加一个脏的提交。这时就可以考虑
git stash。- 使用git的时候,我们往往使用分支(branch)解决任务切换问题,例如,我们往往会建一个自己的分支去修改和调试代码, 如果别人或者自己发现原有的分支上有个不得不修改的bug,我们往往会把完成一半的代码
commit提交到本地仓库,然后切换分支去修改bug,改好之后再切换回来。这样的话往往log上会有大量不必要的记录。其实如果我们不想提交完成一半或者不完善的代码,但是却不得不去修改一个紧急Bug,那么使用git stash就可以将你当前未提交到本地(和服务器)的代码推入到Git的栈中,这时候你的工作区间和上一次提交的内容是完全一样的,所以你可以放心的修Bug,等到修完Bug,提交到服务器上后,再使用git stash apply将以前一半的工作应用回来。- 经常有这样的事情发生,当你正在进行项目中某一部分的工作,里面的东西处于一个比较杂乱的状态,而你想转到其他分支上进行一些工作。问题是,你不想提交进行了一半的工作,否则以后你无法回到这个工作点。解决这个问题的办法就是
git stash命令。储藏(stash)可以获取你工作目录的中间状态——也就是你修改过的被追踪的文件和暂存的变更——并将它保存到一个未完结变更的堆栈中,随时可以重新应用。
需要说明一点,stash是本地的,不会通过git push命令上传到git server上。
实际应用中推荐给每个stash加一个message,用于记录版本,使用git stash save取代git stash命令。
示例:
1 | $ git stash save "test-cmd-stash" |
常用git stash命令:
(1)git stash save "save message" : 执行存储时,添加备注,方便查找,只有git stash 也是可以的,但查找时不方便识别。
(2)git stash list :查看stash了哪些存储
(3)git stash show :显示做了哪些改动,默认show第一个存储,如果要显示其他存贮,后面加stash@{$num},比如第二个 git stash show stash@{1}
(4)git stash show -p : 显示第一个存储的改动,如果想显示其他存存储,命令:git stash show stash@{$num} -p ,比如第二个:git stash show stash@{1} -p
(5)git stash apply :应用某个存储,但不会把存储从存储列表中删除,默认使用第一个存储,即stash@{0},如果要使用其他个,git stash apply stash@{$num} , 比如第二个:git stash apply stash@{1}
(6)git stash pop :命令恢复之前缓存的工作目录,将缓存堆栈中的对应stash删除,并将对应修改应用到当前的工作目录下,默认为第一个stash,即stash@{0},如果要应用并删除其他stash,命令:git stash pop stash@{$num} ,比如应用并删除第二个:git stash pop stash@{1}
(7)git stash drop stash@{$num} :丢弃stash@{$num}存储,从列表中删除这个存储
(8)git stash clear :删除所有缓存的stash
2.14 cherry-pick
git-cherry-pick - Apply the changes introduced by some existing commits
应用场景:在多分支的分布式开发过程中,在合并代码时分两种情况,一种是将另一个分支中的所有代码都合并带当前分支中来,此时可以使用
git merge <branch name>命令实现;还有一种情况是只需要将另一个分支中的部分代码合并到当前分支中来,这个时候就需要使用git cherry-pick <commitHash>命令来实现了,即将另一个分支的部分commit提交到当前的分支中。Git进阶教程-5-5-如何再次应用已经存在的提交的修改 (videos tutorials)
git cherry-pick tutorials (more commands informations here)
2
3
4
5
6
7
8
9
10
11
12
13
14
15
16
17
18
$ git add 1.txt && git commit -m "add a txt file"
ASUS@ZHG_ASUS MINGW64 ~/OneDrive/learngit (master)
$ git log
commit db298e7bb373711438efdab0e64bbab72b5b5cac (HEAD -> master)
Author: crazyjums <crazyjums@gmail.com>
Date: Thu Jun 24 10:28:47 2021 +0800
add a txt file
$ git checkout topic
$ git cherry-pick db298e7
ASUS@ZHG_ASUS MINGW64 ~/OneDrive/learngit (topic)
$ git log
commit ed9bd8a0e76044141efdf26547092eae24e38400 (HEAD -> topic)
Author: crazyjums <crazyjums@gmail.com>
Date: Thu Jun 24 10:28:47 2021 +0800
add a txt fileif use the options [-n], it’s no commits in current branch.
if use the options [-x], you can track the commits
2
3
4
5
6
7
8
9
10
ASUS@ZHG_ASUS MINGW64 ~/OneDrive/learngit (topic)
$ git log
commit 6ba043389d5940b743ab39e37419ebc82685b0af (HEAD -> topic)
Author: crazyjums <crazyjums@gmail.com>
Date: Thu Jun 24 10:41:48 2021 +0800
add 2.txt
(cherry picked from commit 771858e928c708923e843ffe4c29843f2900125a) # this line will display the trackability informationif use the options [-e] or [–edit], you can edit the file before you commit
2.15 help
用法:
1 | $ git help [command] |
2.16 查看git日志
git log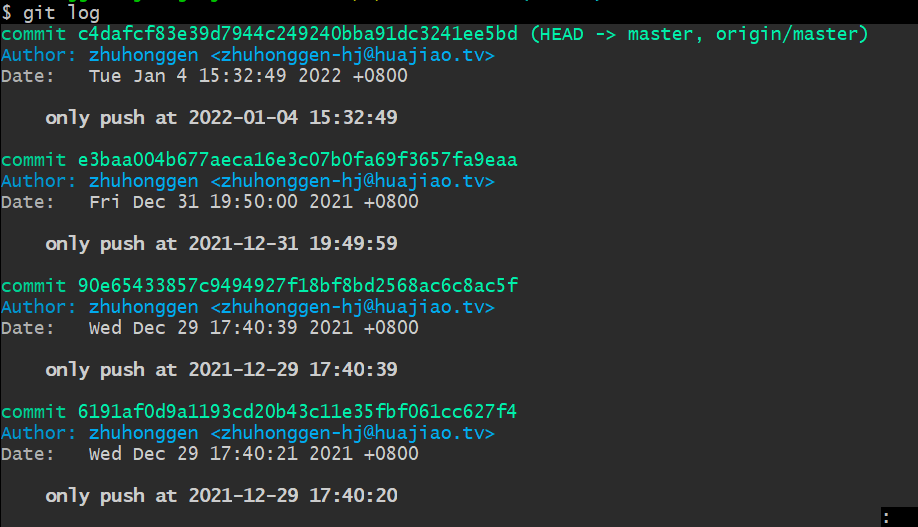
git reflog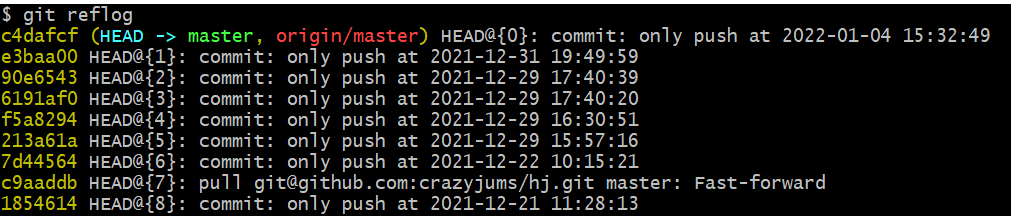
git log --pretty=oneline
git log --oneline
3 使用gitlab搭建git服务器
Reference
- sourcetree
- idea
- https://www.cnblogs.com/tocy/p/git-stash-reference.html
- https://www.cnblogs.com/zndxall/p/9586088.html
- https://tonybai.com/2020/04/07/illustrated-tale-of-git-internal-key-concepts/
- Git 从master拉取代码创建新分支
- git撤销commit
- https://www.jianshu.com/p/debb41296cfb
- https://zhuanlan.zhihu.com/p/58962086
写在最后
欢迎大家关注鄙人的公众号【麦田里的守望者zhg】,让我们一起成长,谢谢。
 wechat
 alipay
 bitcoin