Linux
可以掌握常用工具的日常使用场景:
awk统计ip
awk基本内置变量:FS、OFS、RS、ORS、NR、NF(输出最后一个字段,
$NF)、BEGIN、END、FILENAME、ARGC、ARGVprintf:格式化输出
print:正常输出
模式匹配:匹配字符使用
/[string]/括起来- 匹配所有行中只要含
root的行:awk '/root/ {print $0} 1.txt' -
^符号表示开头,比如:awk '/^root/ {print $0} 1.txt',该语句输出1.txt文件中的所有以root开头的行
- 匹配所有行中只要含
运算符匹配:
>、<、>=、<=、==、!=、~(匹配正则表达式)、!~(不匹配正则表达式)- 如果需要对某个变量进行匹配,则需要在变量后面加上
~符号,表示匹配的意思,比如:awk '$1~/root/ {print $0} 1.txt'
- 如果需要对某个变量进行匹配,则需要在变量后面加上
布尔运算符:
&&,与符号用于连接多个匹配关系:$3>50 && $3<100,即第三个变量大于50且小于100||,或符号!,非符号计算文件中的所有空白行的总数
grep
grep, egrep, fgrep - print lines that match patterns. Search for content in a file.
Basic usage:
grep “search_content” filename
1
2
3
[root@192 pig]# grep "this" 1.txt
1 this is a line
2 this is the no.2 linegrep
-c“search_content” filename //count the [search content] in filename1
2[root@192 pig]# grep -c "this" 1.txt
2grep
-i“search_content” filename //ignore case1
2
3
4[root@192 pig]# grep -i "this" 1.txt
1 this is a line
2 this is the no.2 line
This is me.grep
-n“search_content” filename //show line number1
2
3[root@192 pig]# grep -n "this" 1.txt
1:1 this is a line
2:2 this is the no.2 linegrep
-v“search_content” filename //match all strings in reverse1
2
3
4
5
6
7
8
9
10[root@192 pig]# grep -v "this" 1.txt
how are you now.
I am fine, thank you.
This is me.
[root@192 pig]# cat 1.txt
1 this is a line
2 this is the no.2 line
how are you now.
I am fine, thank you.
This is me.union the parameters together
1
2
[root@192 pig]# grep -ic "this" 1.txt
3
Regular Match:
*: Refers to match one character zero or more times
.: When you use it only, it means match all strings. If you use it with search content, it means any character.

{n,m}: Match a character betweennandmtimes.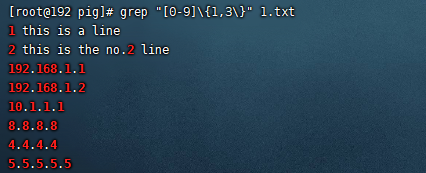
^: Start character.$: End character. //Use^and$can match the IP address specifically.
^$: This means match a empty line.
\b: Bountdary match.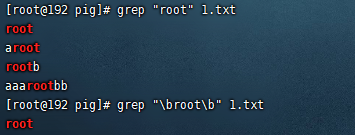
-B: None boundary match.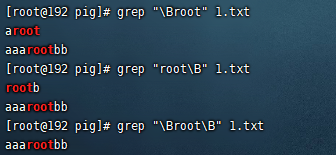
[]: range matge. For example, [0-9] refers to all digits between 0 and 9. //[a-z]. [A-Z]. [0-9]\w: Refers to[0-9a-zA-Z].\W: Refers to[^0-9a-zA-Z]
WildCard:
?: Match the previous character zero or one time.

+: Match the previous character one or more times.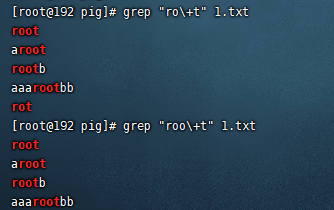
(): It’s a selection, offen use with|together,|means or.
find
find - search for files in a directory hierarchy
Common parameters:
-name 按名称查找 -size 按大小查找 -user 按属性查找 -type 按类型查找 -iname 忽略大小写 Find all confgure files in
/etcdirectory1
$ find /etc/ -name "*.conf"
Find in current directory
1
$ find . -name "1*"
Find files by type
file type refers to file type refers to f a file b a block divice d a directory c a character divice l a soft link p pipeline s a socket 1
$ find -type f
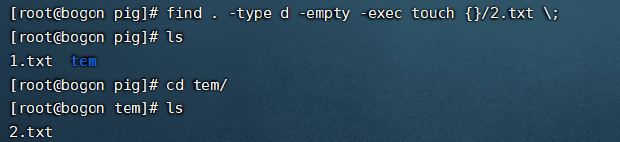
find -execorfind -ok, execute a command after find. The template is-exex {} \;, You should know there is a space between{}and\;.1
2$ find -type d -empty -exec touch /2.txt {} \; // find a enpty directory, and touch a file named 2.txt
$ $ find -type d -empty -ok touch /2.txt {} \; // when you use "ok" instead of "exec", it will let you confirm and execute.
-size, Find files by size.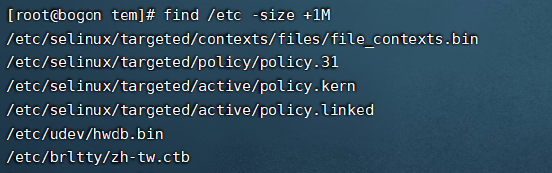
-user. Find by owner.1
$ find /directory -user [uesr name]

-group. Find by group.Mutli-condition find.
-arefers to and,-orefers to or.
locatecommand is faster thanfind, becauselocateis find from a database, but this database need manual to update.1
2
3
4
5
6// install locate
$ sudo yum install mlocate
// update database
$ updatedb
// find a file
$ locate /etc/my
curl
curl means client URL tool, curl in short.
get request:
1
curl https://www.baidu.com # default request is get
-A: user can specfiy the user-agent of th request-b: send a cookie to server1
2curl -b 'foo=bar;foo2=bar2;...' https://www.baidu.com # cookie name is foo, value is bar
curl -b cookie.txt https://www.baidu.com # send the cookie file to server-c: write the cookie information that server sent to client into a file-d: If you want to use POST request to access website, you should send data to server.1
2curl -d 'username=admin&passwd=admin' [X POST] https://www.baidu.com
curl -d '@data.txt' https://www.baidu.com # post data is in a file--data-urlencode: same as-d, this command can change the data to urlcode.
了解:logrotate,rsync
掌握ansible基本用法:主要用于批量查日志,执行命令。
automate-with-ansible in simple chinese
pingenable this config,
record_host_keys=Flase. And add the host’s ip address in the file(/etc/ansible/hosts).1
2
3$ ssh-keygen
$ ssh-copy-id [ip_address]
$ ansible -m pingansible-playbook: execute a script.1
2$ ansible-playbook hello.yml
$ cat hello.yml

ansible-vault: encrypt or decrypt a file, to ensure the secrity of the file.1
2$ ansible-vault encrypt hello.yml
$ ansible-vault decrypt hello.ymlansible-console: A interact command line of ansible.
Ansible Module:
use module:
- command: execute only system command
- shell: execute the command via shell process
- raw: execute the low level command
1
2$ ansible [host group] -m [module name] -a "[command line]"
$ ansible webserver -m command/shell -a "ls /etc"
Change default module:
change config file(/etc/ansible/ansible.cfg), enable the line and change it.
1
2module_name = command // change it to shell
module_name = shellscript: Run a script on the remote hosts1
$ ansible [host group] -m script -a "test.sh"
copy: Copy files from current host to remote hosts.1
2$ ansible [host group] -m copy -a "src=/etc/systemfig dest=data/os.txt" owner=[user name] mode=600
$ ansible webserver -m copy -a "src=/home/centos/pig/1.txt dest=/home/root123/2.txt owner=root123 mode=600"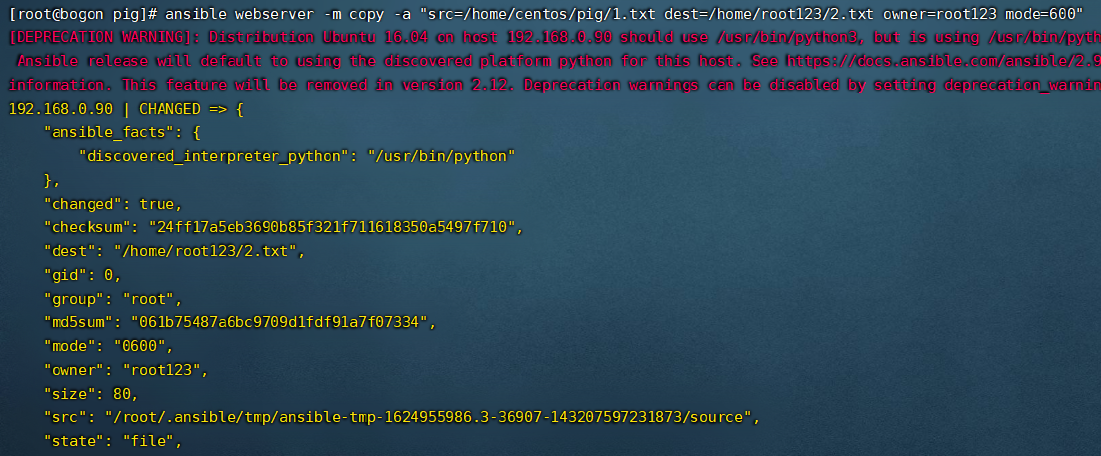
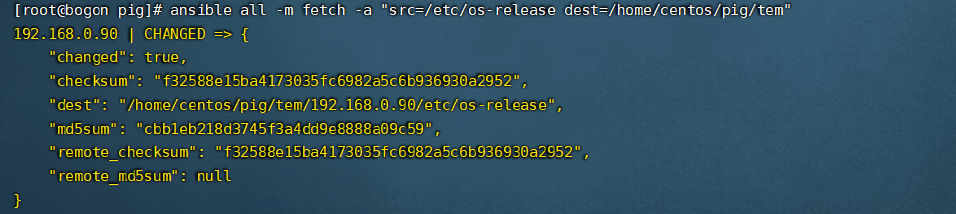
fetch: Fetch a file from remote hosts. Thismustbe a file, not a directory. Likecopy.1
$ ansible all -m fetch -a "src=/etc/os-release dest=/home/centos/pig/tem"
file: change file’s attributes, create a empty file.1
$ ansible webserver -m file -a "path=/home/root123/new.txt state=touch"

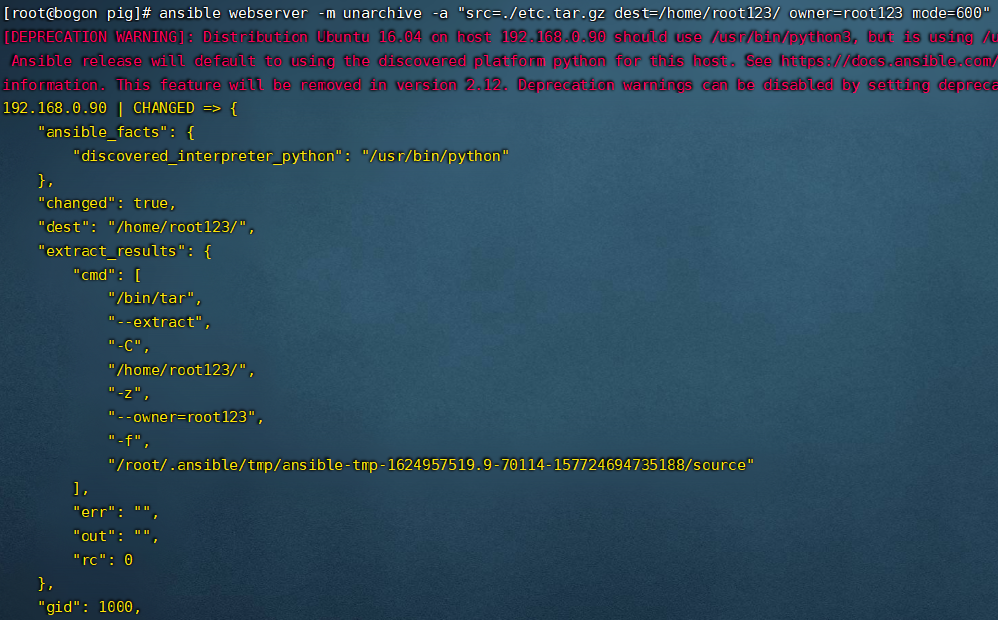
unarchive: unzip a file.1
$ ansible webserver -m unarchive -a "src=./etc.tar.gz dest=/home/root123/ owner=root123 mode=600" // push the zip file to the remote hosts and unzip it.
rsync
rsync – a fast, versatile, remote (and local) file-copying tool
The
rsynccan replace the commandcpin linux, for example, you can usersync -r source destinationto replacecp -r source destination.sync local file:
1
$ rsync -a source destination
sync remote host file:
1
$ rsync -av -e 'ssh -p 22' [source] user@remoteHostAddress:[destination]
-vdisplay the details of the information-aarchive mode-elog in to remote host
掌握ansible基本用法:主要用于批量查日志,执行命令。
Http:
常用header: Host
请求:request
Header 解释 示例 Accept 指定客户端能够接收的内容类型 Accept: text/plain, text/html Accept-Charset 浏览器可以接受的字符编码集。 Accept-Charset: iso-8859-5 Accept-Encoding 指定浏览器可以支持的web服务器返回内容压缩编码类型。 Accept-Encoding: compress, gzip Accept-Language 浏览器可接受的语言 Accept-Language: en,zh Accept-Ranges 可以请求网页实体的一个或者多个子范围字段 Accept-Ranges: bytes Authorization HTTP授权的授权证书 Authorization: Basic QWxhZGRpbjpvcGVuIHNlc2FtZQ== Cache-Control 指定请求和响应遵循的缓存机制 Cache-Control: no-cache Connection 表示是否需要持久连接。(HTTP 1.1默认进行持久连接) Connection: close Cookie HTTP请求发送时,会把保存在该请求域名下的所有cookie值一起发送给web服务器。 Cookie: $Version=1; Skin=new; Content-Length 请求的内容长度 Content-Length: 348 Content-Type 请求的与实体(body)对应的MIME信息 Content-Type: application/x-www-form-urlencoded Date 请求发送的日期和时间 Date: Tue, 15 Nov 2010 08:12:31 GMT Expect 请求的特定的服务器行 为 Expect: 100-continue From 发出请求的用户的Email From: user@email.com Host 指定请求的服务器的域名和端口号 Host: www.baidu.com If-Match 只有请求内容与实体相匹配才有效 If-Match: “737060cd8c284d8af7ad3082f209582d” If-Modified-Since 如果请求的部分在指定时间之后被修改则请求成功,未被修改则返回304代码 If-Modified-Since: Sat, 29 Oct 2010 19:43:31 GMT If-None-Match 如果内容未改变返回304代码,参数为服务器先前发送的Etag,与服务器回应的Etag比较判断是否改变 If-None-Match: “737060cd8c284d8af7ad3082f209582d” If-Range 如果实体未改变,服务器发送客户端丢失的部分,否则发送整个实体。参数也为Etag If-Range: “737060cd8c284d8af7ad3082f209582d” If-Unmodified-Since 只在实体在指定时间之后未被修改才请求成功 If-Unmodified-Since: Sat, 29 Oct 2010 19:43:31 GMT Max-Forwards 限制信息通过代理和网关传送的时间 Max-Forwards: 10 Pragma 用来包含实现特定的指令 Pragma: no-cache Proxy-Authorization 连接到代理的授权证书 Proxy-Authorization: Basic QWxhZGRpbjpvcGVuIHNlc2FtZQ== Range 只请求实体的一部分,指定范围 Range: bytes=500-999 Referer 先前网页的地址,当前请求网页紧随其后,即来路 Referer: http://www.baidu.com/archives/71.html TE 客户端愿意接受的传输编码,并通知服务器接受接受尾加头信息 TE: trailers,deflate;q=0.5 Upgrade 向服务器指定某种传输协议以便服务器进行转换(如果支持) Upgrade: HTTP/2.0, SHTTP/1.3, IRC/6.9, RTA/x11 User-Agent User-Agent的内容包含发出请求的用户信息 User-Agent: Mozilla/5.0 (Linux; X11) Via 通知中间网关或代理服务器地址,通信协议 Via: 1.0 fred, 1.1 nowhere.com (Apache/1.1) Warning 关于消息实体的警告信息 Warn: 199 Miscellaneous warning 相应:response
Header 解释 示例 Accept-Ranges 表明服务器是否支持指定范围请求及哪种类型的分段请求 Accept-Ranges: bytes Age 从原始服务器到代理缓存形成的估算时间(以秒计,非负) Age: 12 Allow 对某网络资源的有效的请求行为,不允许则返回405 Allow: GET, HEAD Cache-Control 告诉所有的缓存机制是否可以缓存及哪种类型 Cache-Control: no-cache Content-Encoding web服务器支持的返回内容压缩编码类型。 Content-Encoding: gzip Content-Language 响应体的语言 Content-Language: en,zh Content-Length 响应体的长度 Content-Length: 348 Content-Location 请求资源可替代的备用的另一地址 Content-Location: /index.htm Content-MD5 返回资源的MD5校验值 Content-MD5: Q2hlY2sgSW50ZWdyaXR5IQ== Content-Range 在整个返回体中本部分的字节位置 Content-Range: bytes 21010-47021/47022 Content-Type 返回内容的MIME类型 Content-Type: text/html; charset=utf-8 Date 原始服务器消息发出的时间 Date: Tue, 15 Nov 2010 08:12:31 GMT ETag 请求变量的实体标签的当前值 ETag: “737060cd8c284d8af7ad3082f209582d” Expires 响应过期的日期和时间 Expires: Thu, 01 Dec 2010 16:00:00 GMT Last-Modified 请求资源的最后修改时间 Last-Modified: Tue, 15 Nov 2010 12:45:26 GMT Location 用来重定向接收方到非请求URL的位置来完成请求或标识新的资源 Location: http://honglu.me/archives/ Pragma 包括实现特定的指令,它可应用到响应链上的任何接收方 Pragma: no-cache Proxy-Authenticate 它指出认证方案和可应用到代理的该URL上的参数 Proxy-Authenticate: Basic refresh 应用于重定向或一个新的资源被创造,在5秒之后重定向(由网景提出,被大部分浏览器支持) Refresh: 5; url=http://honglu.me/archives/ Retry-After 如果实体暂时不可取,通知客户端在指定时间之后再次尝试 Retry-After: 120 Server web服务器软件名称 Server: Apache/1.3.27 (Unix) (Red-Hat/Linux) Set-Cookie 设置Http Cookie Set-Cookie: UserID=JohnDoe; Max-Age=3600; Version=1 Trailer 指出头域在分块传输编码的尾部存在 Trailer: Max-Forwards Transfer-Encoding 文件传输编码 Transfer-Encoding:chunked Vary 告诉下游代理是使用缓存响应还是从原始服务器请求 Vary: * Via 告知代理客户端响应是通过哪里发送的 Via: 1.0 fred, 1.1 nowhere.com (Apache/1.1) Warning 警告实体可能存在的问题 Warning: 199 Miscellaneous warning WWW-Authenticate 表明客户端请求实体应该使用的授权方案 WWW-Authenticate: Basic
跨域 Cookie
CORS tutorials: A guide to cross-origin resource sharing
同源策略是指在Web浏览器中,允许某个网页脚本访问另一个网页的数据,但前提是这两个网页必须有相同的URI、主机名和端口号,一旦两个网站满足上述条件,这两个网站就被认定为具有相同来源。此策略可防止某个网页上的恶意脚本通过该页面的文档对象模型访问另一网页上的敏感数据。
同源策略对Web应用程序具有特殊意义,因为Web应用程序广泛依赖于HTTP cookie[1]来维持用户会话,所以必须将不相关网站严格分隔,以防止丢失数据泄露。
值得注意的是同源策略仅适用于脚本,这意味着某网站可以通过相应的HTML标签[2]访问不同来源网站上的图像、CSS和动态加载脚本等资源。而跨站请求伪造就是利用同源策略不适用于HTML标签的缺陷。
在
协议、域名(包括根域名和子域名)、端口号三者其中任何一项不一致的情况下,两个网址就不能进行互相通信,只有这三者都相同的情况下才可以进行通信,否则就叫跨域。- a different scheme(http or https)
- a different domain
- a different port
为什么会有跨域限制?
答:浏览器会有跨域限制,二服务器没有这种限制。
在HTML标签中,其中
img、link、script、iframe这几个标签具有跨域性,可以直接访问不同域的资源。figure it out
set the header like this:
1
Access-Control-Allow-Origin: * # if a request can be made from any originAccess-Control-Allow-Origin: https://example.com # the origin that is allowed to make the request
Two type of CORS Request
simple request(
GET、POST、HEAD)preflight request(
OPTIONS)A preflight request example:
1
# Requestcurl -i -X OPTIONS localhost:3001/api/ping \-H 'Access-Control-Request-Method: GET' \-H 'Access-Control-Request-Headers: Content-Type, Accept' \-H 'Origin: http://localhost:3000'
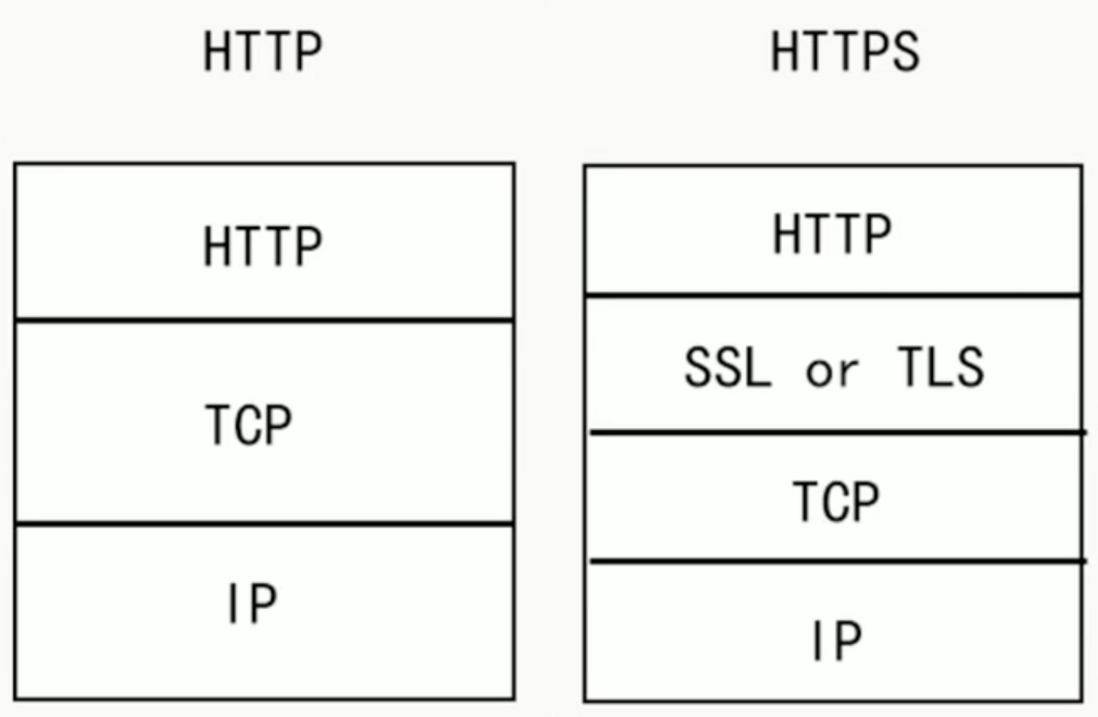
https原理
HTTP协议是一种不安全的传输协议,所有数据在传输过程都是明文传输,很容易被第三方截获,造成数据不安全。
HTTPS使用混合加密协议对数据进行加密,即对称加密和非对称加密:
对称加密和非对称加密的优缺点:
- 对称加密的加密和解密的速度快,效率高;非对称加密算法的加密和解密的速度满,效率低
- 对称加密算法的加密和解密都是用的同一个密钥,密钥的传输成本较高;非对称加密算法的加密和解密采用的是不同的密钥,一个公钥一个私钥,公钥可以对外公开,密钥传输的成本较低。
Hypertext Transfer Protocol Secure (HTTPS) is an extension of the Hypertext Transfer Protocol (HTTP). It is used for secure communication over a computer network, and is widely used on the Internet.[1][2] In HTTPS, the communication protocol is encrypted using Transport Layer Security (TLS) or, formerly, Secure Sockets Layer (SSL). The protocol is therefore also referred to as HTTP over TLS,[3] or HTTP over SSL.
The principal motivations for HTTPS are authentication of the accessed website, and protection of the privacy and integrity of the exchanged data while in transit. It protects against man-in-the-middle attacks, and the bidirectional encryption of communications between a client and server protects the communications against eavesdropping and tampering.[4][5] The authentication aspect of HTTPS requires a trusted third party to sign server-side digital certificates. This was historically an expensive operation, which meant fully authenticated HTTPS connections were usually found only on secured payment transaction services and other secured corporate information systems on the World Wide Web. In 2016, a campaign by the Electronic Frontier Foundation with the support of web browser developers led to the protocol becoming more prevalent.[6] HTTPS is now used more often by web users than the original non-secure HTTP, primarily to protect page authenticity on all types of websites; secure accounts; and to keep user communications, identity, and web browsing private.[7]
HTTPS=HTTP+TLS/SSL数字正式在HTTPS中相当于非对称加密算法的私钥和公钥的分配这么一个工作。

Redis
hash,zset,set,string 等数据类型的常用指令和时间复杂度
- string:
add a key-value type data, use
set key valuecommand1
> set name zhangsanOK
read the value of the key given by user
1
> get name"zhangsan"
序号 命令及描述 means 1 SET key value 设置指定 key 的值 add a new key-value type data 2 GET key 获取指定 key 的值。 read key;s value 3 GETRANGE key start end 返回 key 中字符串值的子字符 read the substring of the key 4 GETSET key value 将给定 key 的值设为 value ,并返回 key 的旧值(old value)。 change key’s value 5 GETBIT key offset 对 key 所储存的字符串值,获取指定偏移量上的位(bit)。 6 [MGET key1 key2..] 获取所有(一个或多个)给定 key 的值。 7 SETBIT key offset value 对 key 所储存的字符串值,设置或清除指定偏移量上的位(bit)。 8 SETEX key seconds value 将值 value 关联到 key ,并将 key 的过期时间设为 seconds (以秒为单位)。 9 SETNX key value 只有在 key 不存在时设置 key 的值。 10 SETRANGE key offset value 用 value 参数覆写给定 key 所储存的字符串值,从偏移量 offset 开始。 11 STRLEN key 返回 key 所储存的字符串值的长度。 12 [MSET key value key value …] 同时设置一个或多个 key-value 对。 13 [MSETNX key value key value …] 同时设置一个或多个 key-value 对,当且仅当所有给定 key 都不存在。 14 PSETEX key milliseconds value 这个命令和 SETEX 命令相似,但它以毫秒为单位设置 key 的生存时间,而不是像 SETEX 命令那样,以秒为单位。 15 INCR key 将 key 中储存的数字值增一。 16 INCRBY key increment 将 key 所储存的值加上给定的增量值(increment) 。 17 INCRBYFLOAT key increment 将 key 所储存的值加上给定的浮点增量值(increment) 。 18 DECR key 将 key 中储存的数字值减一。 19 DECRBY key decrement key 所储存的值减去给定的减量值(decrement) 。 20 APPEND key value 如果 key 已经存在并且是一个字符串, APPEND 命令将指定的 value 追加到该 key 原来值(value)的末尾。 掌握正确的redis分布式锁。
mysql
了解索引结构
常用索引优化技巧
其他:
markdown语法和 typora 使用
git command
add files to the remote repository
4 steps when you
gitfiles to the remote repository:- git add filename1, filename2, …. or git add * (add all)
- git commit -m “add a hit here”
- git remote add origin “repository address”
- git push origin branch_name (such as: master)
merge
1
$ git merge <branch name> # when you are in a branch, this command means merge <branch name> to this branch Jums@Computer MINGW64 ~/OneDrive/learngit (master) # current branch is master, merge <topic> to master$ git merge topicAuto-merging readme.mdCONFLICT (content): Merge conflict in readme.mdAuto-merging 2.pyCONFLICT (content): Merge conflict in 2.pyRemoving 1.pyAutomatic merge failed; fix conflicts and then commit the result.
How to fix merge conflict:
When the merge conflict comes: When two files have two different sets of modifications in the same location, git cannot decide which modification to use and needs to be manually specified.
The codes bewteen
<<<<<<<HEADand=======is in the current branch, and the codes bewtten=======and>>>>>>[branch name]is in the [branch name]. You shoud manually merged the codes.After that, you also should
addthe files to repository, use the following command:1
$ git add [file name]$ git commit -m "" # you can't add the [file name] here, or you will get a error
rebase
git-rebase - Reapply commits on top of another base tip
https://www.bilibili.com/video/BV19B4y1u7vm?from=search&seid=7525997366811669539 (video tutroials)
reset
对提交的版本进行回退,可以根据
git log命令查看已经提交的版本,然后可以根据指定commit id或者HEAD回退到不同的版本,git log信息如下:1
$ git logcommit 466755c74ed4fd27059f6b0e4f42d0c3dcb8b663 (HEAD -> master, origin/master)Author: crazyjums <crazyjums@gmail.com>Date: Mon Jun 21 14:58:11 2021 +0800add a second titlecommit b57119f13a741f116daabfebd27b51a990b7322aAuthor: crazyjums <crazyjums@gmail.com>Date: Mon Jun 21 14:39:35 2021 +0800modified the file, add a new linecommit 1f7990b84caf752f9e22d1dbcf215d5285066d25Author: crazyjums <crazyjums@gmail.com>Date: Mon Jun 21 14:27:27 2021 +0800first time to commit
HEAD表示当前的版本号,如果需要回退到上一个版本号,则可以使用HEAD^、上上一个版本号则是HEAD^^、往上倒100个可以在HEAD后面写上100个^符号,当然也可以写成HEAD~100。HEAD在git中其实是一个指针,指向不同的版本号,回退也就是将HEAD指针重新指向了不同的版本信息。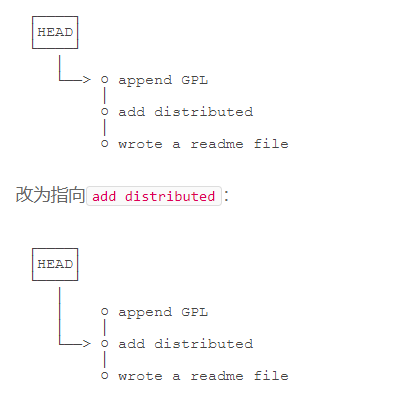
除了使用
HEAD之外,还可以使用commit id进行回退,每一次版本提交都有一个宇宙唯一的commit id,指定该commit id的前几位就行,git会自行查找。1
$ git reset --hard HEAD~2HEAD is now at 1f7990b first time to commit$ git reset --hard 466755HEAD is now at 466755c add a second title
在使用
git log命令时,只会显示当前命令窗口的历史提交记录,如果电脑重启之后,在使用git log命令出现的历史记录会是空,但是在git中,就算是重启电脑之后,还是有办法找到每一次的历史提交记录,可以使用命令:git reflog:1
$ git reflog1f7990b (HEAD -> master) HEAD@{0}: reset: moving to HEAD~2466755c (origin/master) HEAD@{1}: reset: moving to 4667551f7990b (HEAD -> master) HEAD@{2}: reset: moving to HEAD~2466755c (origin/master) HEAD@{3}: reset: moving to 466755b57119f HEAD@{4}: reset: moving to HEAD^466755c (origin/master) HEAD@{5}: commit: add a second titleb57119f HEAD@{6}: commit: modified the file, add a new line1f7990b (HEAD -> master) HEAD@{7}: commit (initial): first time to commit
在使用
reset等命令修改了本地文件之后,也就是当前本地电脑上的文件不是git托管平台的最新版本的时候,需要使用git pull命令将git平台的命令拉过来。1
git pull <remote_repository> <branch>
1
$ git pull git@github.com:crazyjums/learngit.git masterFrom github.com:crazyjums/learngit * branch master -> FETCH_HEADAuto-merging readme.mdCONFLICT (content): Merge conflict in readme.mdAutomatic merge failed; fix conflicts and then commit the result.
revert
git-revert - Revert some existing commits
sounds like the
git resetcommand, but this command can remain the trackability information, when you wana go back to the history version inmasterbranch, you should usegit revertcommand instead ofgit reset.This command’s usage just like the
git reset.1
$ git revert HEAD^ # go back to last version$ git revert HEAD~[number] # go back to previous version# you can see the trackability information at `git revert`:commit d567e6e3e14165ffa8febd4c62bac2fa413a1509Author: crazyjums <crazyjums@gmail.com>Date: Thu Jun 24 11:33:43 2021 +0800 Revert "add a txt file by jums" This reverts commit db298e7bb373711438efdab0e64bbab72b5b5cac.
checkout
git-checkout - Switch branches or restore working tree files
1
$ git checkout <branch name> # swtich to a new branch
1
ASUS@ZHG_ASUS MINGW64 ~/OneDrive/learngit (master)$ git checkout new_branchSwitched to branch 'new_branch'ASUS@ZHG_ASUS MINGW64 ~/OneDrive/learngit (new_branch)
stash
git-stash - Stash the changes in a dirty working directory away
应用场景:https://www.cnblogs.com/tocy/p/git-stash-reference.html
- 发现有一个类是多余的,想删掉它又担心以后需要查看它的代码,想保存它但又不想增加一个脏的提交。这时就可以考虑
git stash。 - 使用git的时候,我们往往使用分支(branch)解决任务切换问题,例如,我们往往会建一个自己的分支去修改和调试代码, 如果别人或者自己发现原有的分支上有个不得不修改的bug,我们往往会把完成一半的代码
commit提交到本地仓库,然后切换分支去修改bug,改好之后再切换回来。这样的话往往log上会有大量不必要的记录。其实如果我们不想提交完成一半或者不完善的代码,但是却不得不去修改一个紧急Bug,那么使用git stash就可以将你当前未提交到本地(和服务器)的代码推入到Git的栈中,这时候你的工作区间和上一次提交的内容是完全一样的,所以你可以放心的修Bug,等到修完Bug,提交到服务器上后,再使用git stash apply将以前一半的工作应用回来。 - 经常有这样的事情发生,当你正在进行项目中某一部分的工作,里面的东西处于一个比较杂乱的状态,而你想转到其他分支上进行一些工作。问题是,你不想提交进行了一半的工作,否则以后你无法回到这个工作点。解决这个问题的办法就是
git stash命令。储藏(stash)可以获取你工作目录的中间状态——也就是你修改过的被追踪的文件和暂存的变更——并将它保存到一个未完结变更的堆栈中,随时可以重新应用。
1
$ git stash list # display all stash version$ git stash pop # get the top of the stash stack version$ git stask apply [version number]# when there is a lot of stash versions, you can use this command to specify the version number$ git stash # save current working area to the stash version$ git stash save [a stash name] # the same as the "git stash", but this version will get a nick name you named it.$ git stash drop # delete the top of stash stack's version$ git stash show [version number] # use this command to view specific information of the working area
- 发现有一个类是多余的,想删掉它又担心以后需要查看它的代码,想保存它但又不想增加一个脏的提交。这时就可以考虑
cherry-pick
git-cherry-pick - Apply the changes introduced by some existing commits
应用场景:在多分支的分布式开发过程中,在合并代码时分两种情况,一种是将另一个分支中的所有代码都合并带当前分支中来,此时可以使用
git merge <branch name>命令实现;还有一种情况是只需要将另一个分支中的部分代码合并到当前分支中来,这个时候就需要使用git cherry-pick <commitHash>命令来实现了,即将另一个分支的部分commit提交到当前的分支中。Git进阶教程-5-5-如何再次应用已经存在的提交的修改 (videos tutorials)
git cherry-pick tutorials (more commands informations here)
1
# at master branch$ git add 1.txt && git commit -m "add a txt file"ASUS@ZHG_ASUS MINGW64 ~/OneDrive/learngit (master)$ git logcommit db298e7bb373711438efdab0e64bbab72b5b5cac (HEAD -> master)Author: crazyjums <crazyjums@gmail.com>Date: Thu Jun 24 10:28:47 2021 +0800 add a txt file$ git checkout topic$ git cherry-pick db298e7ASUS@ZHG_ASUS MINGW64 ~/OneDrive/learngit (topic)$ git logcommit ed9bd8a0e76044141efdf26547092eae24e38400 (HEAD -> topic)Author: crazyjums <crazyjums@gmail.com>Date: Thu Jun 24 10:28:47 2021 +0800 add a txt file
if use the options [-n], it’s no commits in current branch.
1
$ git cherry-pick [-n]/[--no-commit] [commit-id]
if use the options [-x], you can track the commits
1
$ git cherry-pick -x [commit-id]ASUS@ZHG_ASUS MINGW64 ~/OneDrive/learngit (topic)$ git logcommit 6ba043389d5940b743ab39e37419ebc82685b0af (HEAD -> topic)Author: crazyjums <crazyjums@gmail.com>Date: Thu Jun 24 10:41:48 2021 +0800 add 2.txt (cherry picked from commit 771858e928c708923e843ffe4c29843f2900125a) # this line will display the trackability information
if use the options [-e] or [–edit], you can edit the file before you commit
1
$ git cherry-pick -e [commit-id] # now it will jump to editing interface
branch
branche是git tree中的分支,其中主分支是master
1
$ git branch <branch name> # create a new branch $ git push origin <branch name> # push the new branch to remote repository$ git branch -d <branch name> # delete the local branch$ git push origin :<branch name> # delete the remote repository branch$ git chechout <branch name> # swtich to <branch name> branch$ git branch -a # show all branch of your repository
delete file from remote repository
1
$ git rm <file name> or <dic name>$ git commit -m ""$ git push origin <branch name>
ssh 秘钥登陆原理
在远程连接Linux系统时,通常会采用SSH协议作为底层的安全协议,连接的格式如下:
ssh user@hostAddr加密方式同样采用的混合加密技术,即对称加密和非对称加密的混合使用
远程主机和当前主机如何保证公钥的一致性,即如果防止中间人攻击:主机将自身的公钥公示于网络,即大众可查询的媒体上面,如果需要连接到远程主机,如果是第一次连接的话,远程主机会给出一个警告,并要求客户核对当前远程主机的公钥是否公示的公钥一致,如果一致的话,就可以进行登录了。
了解postman 使用
写在最后
欢迎大家关注鄙人的公众号【麦田里的守望者zhg】,让我们一起成长,谢谢。
 wechat
 alipay
 bitcoin